
Water HotSpring Breakdown
Published: , Type: Shader Tutorial
Here’s a quick breakdown of this shader I showcased on Twitter.
We need a base texture that we can use for water caustics. We could also procedurally generate this in the shader but I think its too much effort for a simple effect like this.
Here’s a CC0 water caustics texture I made that you can use to try out this effect: 
This is not the same texture I used in the tweet, it one that I made for this article The license for this texture is CC0, feel free to use it for whatever you need.
Mesh setup
We’re just using a simple Plane mesh in Godot, which is a built-in mesh type. Create a new MeshInstance node and assign a PlaneMesh as its mesh.
Shader time!
Let’s start of by creating a shader for the effect:
- Create a new
ShaderMaterialfor theMeshInstance - Create a new
Shaderunder theShaderMaterial
We’ll start off by defining a standard spatial shader, along with all the uniforms we will need for this effect:
shader_type spatial;

uniform sampler2D caustics_texture : hint_black;
uniform sampler2D color_gradient : hint_albedo;
uniform sampler2D distort_noise : hint_black;

uniform float flow_speed = 0.3;
uniform float vignette_size = 0.3;
uniform float vignette_blend = 0.1;
uniform float distort_strength = 0.1;
uniform float disc_speed = 0.5;

const float TAU = 6.283185307;

void vertex()
{

}

void fragment()
{

}
The TAU constant is the value of 2 * pi, which we will need for the polar coordinates later on.
Let’s start with the fragment() function. We need to sample our caustics texture, that is stored in the uniform caustics_texture, however, we need it to emit out from the center of the plane.
Instead of sampling our texture using regular UV coordinates, instead we will transform them into the “polar coordinates system”. This is different from the “cartesian coordinate system” that you are probably familiar with so far. Here’s a quick rundown if you’re unfamiliar:
2D Cartesian coordinates are the usual $x$ and $y$ coordinates that you have probably used extensively before. These coordinates define the position of something within space using distances along their respective axes. For example, $(5, 10)$ denotes 5 units along the “x-axis” and 10 units along the “y-axis”.
Polar coordinates, instead, denote the position of something by using two values: the distance along a line, and the angle at which the line is rotated, mathematically expressed as $(r, \theta)$. For example, $(10, 0.3)$ in polar coordinates denotes 10 units along a line that has been rotated 0.3 radians from the “x-axis”.
In effect, using polar coordinates gives us very circular looking textures. Here’s the function that does that (Godot Shaders, 2021):
vec2 polar_coordinates(vec2 uv, vec2 center, float zoom, float repeat)
{
	vec2 dir = uv - center;
	highp float radius = length(dir) * 2.0;
	highp float angle = atan(dir.y, dir.x) / TAU;
	return mod(vec2(radius * zoom, angle * repeat), 1.0);
}
Recall that UV coordinates run from 0.0 to 1.0 on each axis. So the point vec2(0.5, 0.5) is the midpoint of the plane. Using this, let’s construct our polar coordinates and use them to sample the texture:
// Polar UVs
vec2 base_uv = UV;
highp vec2 polar_uv = polar_coordinates(base_uv, vec2(0.5), 1.0, 1.0);
float caus = texture(caustics_texture, polar_uv).r;
Using the polar coordinate system, animating the water moving outwards is really easy! All we need to do is modify the $r$ value of our polar UVs over time:
// Animated Polar UVs
vec2 base_uv = UV;
highp vec2 polar_uv = polar_coordinates(base_uv, vec2(0.5), 1.0, 1.0);
polar_uv.x -= TIME * flow_speed;
float caus = texture(caustics_texture, polar_uv).r;
ALBEDO = vec3(caus);
 Checkpoint 1
That was the basis for our effect complete! However, its a little too uniform in the way it moves, and also the foam doesn’t fade out at the edge which looks pretty weird. Let’s fix both of those.
To make the water less uniform, we’ll modify our base_uv by adding some noise to it, which should break up the water and make it look more wavy!
vec2 base_uv = UV;
float dn = texture(distort_noise, UV + TIME * 0.1).r;
base_uv += dn * distort_strength;
base_uv -= distort_strength / 2.0;
What’s the reason from subtracting distort_strength / 2.0? We do this because when we add the distortion value to our base_uv, we actually end up offsetting it by a net value of distort_strength / 2.0, so we subtract that value to re-center the UVs again.
Cool! Now let’s fix our second issue of fading towards the edge. To do this, we need to create a mask that’s 1.0 in the center and 0.0 near the edge. We can develop this mask using the distance to the center of the plane, and the smoothstep() function.
First, let’s get the distance to the center of the plane. Note that vec2(0.5) is a shorthand for vec2(0.5, 0.5) in GLSL.
// Fade out caustics
float cd = distance(UV, vec2(0.5));
Now let’s use the smoothstep() function to control our edge. Here’s a quick review of smoothstep() if you’re new to shaders:
The
smoothstep()function is an extension of thestep()function in GLSL. It takes three parameters:smoothstep(edge0, edge1, value).It returns
0.0if $\text{edge}_0\le\text{value}$Or returns
1.0if $\text{edge}_1\ge\text{value}$Otherwise, it interpolates (non-linearly) between
0.0and1.0if $\text{edge}_0<\text{value}<\text{edge}_1$
Using this, we can create an edge fade using the following formula.
The formula below is very common and useful in shader programming. It can be used for many situations where you need to create a smooth transition between two values using a
sizeandblendamount.
// Fade out caustics
float cd = distance(UV, vec2(0.5));
float vign = 1.0 - smoothstep(vignette_size, vignette_size + vignette_blend, cd);
Note: I called the fading effect a “vignette” here, even though its not really a vignette
Finally, let’s throw in a bit of color before hitting that second checkpoint! Assign a GradientTexture to the color_gradient uniform and give it the colors of your choice. The left values of the gradient will be assigned to darker colors and the right values of the gradient will be assigned to lighter colors.
To actually make the coloring work, we need to sample the gradient using the current value of our caustics. Since the gradient runs from left to right, and our caustics value is between 0.0 and 1.0, we can treat our caustics like a UV coordinate and sample the gradient!
// Color the caustics
float grad_uv = caus * vign;
vec3 color = texture(color_gradient, vec2(grad_uv)).rgb;
ALBEDO = color;
You should have something that looks like this now: 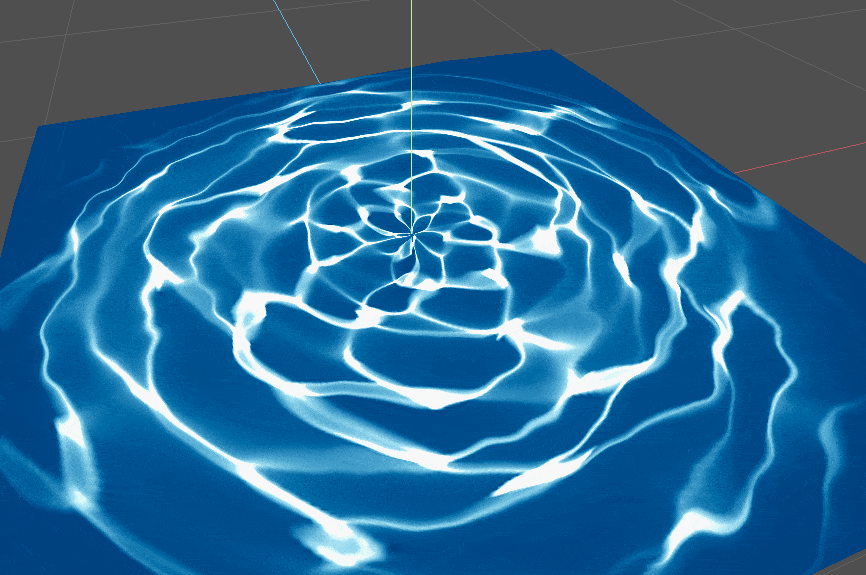 Checkpoint 2
We could call it quits here and say the effect is done, but I’ve got one more effect I want to throw in there to make things look even better.
I want the center of the water to pulsate outwards with little ripples of water. We can make that by creating a bunch of discs that move outward and fade with time.
Stuff is about to get a little crazy, but don’t worry, Nekoto’s gonna guide you through it!
Let me explain how to make a single disc before we get to making multiple. To make a moving disc, we just need to make a mask that has a radius that increases over time:
Don’t write down any code yet, let’s breakdown a single disc first.
// Expanding disc
float starting_radius = 0.1;
float movement = starting_radius + TIME * disc_speed;
float disc = smoothstep(cd, cd + 0.01, loop);
Notice that smoothstep(cd, cd + 0.01, loop)? Its the same formula from earlier; smoothstep(size, size + blend, value)! The 0.01 is a small blending amount to smooth the edges of our circle. Otherwise, we’ll end up with some really ugly aliased edges.
This is not enough though. The disc keeps expanding outwards to infinity. We need it to loop at a certain radius.
Here’s a little shader trick. The fract() function returns the fractional part of any number:
fract(1.345)returns0.345fract(214523.2465)returns0.2465
Therefore, we can use fract(TIME) to get a value such that: $0\le\text{fract}(\text{TIME})<1$. Which will keep looping our radius between 0.0 and 1.0.
Let’s construct an updated, looping disc:
float radius_disc_maximum = 0.8;
float loop = fract(TIME * disc_speed) * radius_disc_maximum;
float disc = smoothstep(cd, cd + 0.01, loop);
We need the disc to fade near the edges though, which is something we’ve already dealt with earlier in this shader! The only difference is how we calculate the distance to the center.
Recall that the radius of a circle, is actually the distance from the circumference of the circle to its center! To get a fading value, we’ll take the distance between the current radius and the maximum radius using abs(loop - radius), and we’ll make the fade a little more intense by raising it to a power of 5:
float radius_disc = 0.8;
float loop = fract(TIME * disc_speed) * radius_disc;
float disc = smoothstep(cd, cd + 0.01, loop);
float fade = abs(loop - radius_disc);
fade = pow(fade, 5.0);
disc *= fade;
That’s how we make a single disc. Now, to make multiple, we just throw that into a for loop and add an offset to each disc!
// Center discs
float global_disc = 0.0;
for (int i = 0; i < 20; i++){
	float offset = float(i) * 0.2;
	float radius_disc = 0.8;
	float loop = fract((TIME + offset) * disc_speed) * radius_disc;
	float disc = smoothstep(cd, cd + 0.01, loop);
	float fade = abs(loop - radius_disc);
	fade = pow(fade, 5.0);
	disc *= fade;
	disc = clamp(disc, 0.0, 1.0);
	global_disc += disc;
}
global_disc *= 0.6;
I added a global_disc *= 0.6 at the end to reduce the opacity of the discs a little bit. To use our new discs, we’ll just add it to the final color:
ALBEDO = color + global_disc;
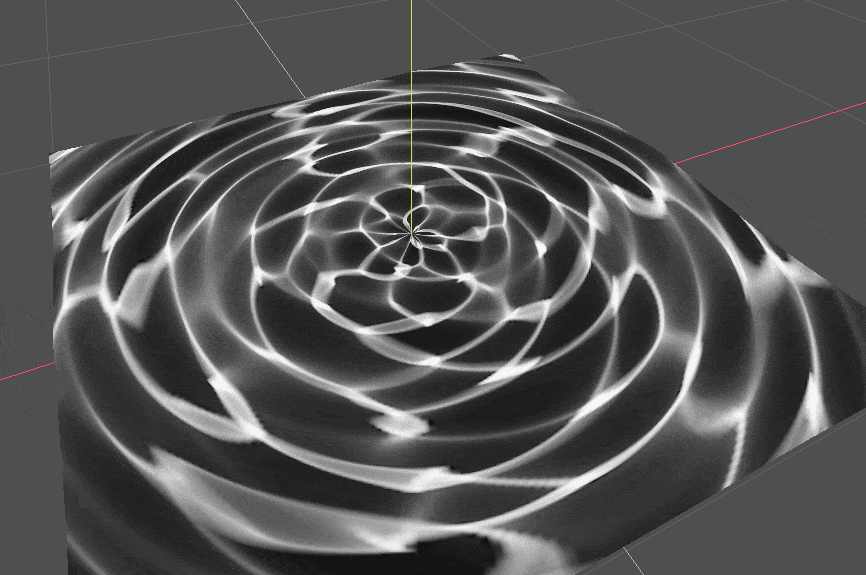
Here’s what our final shader should look like: 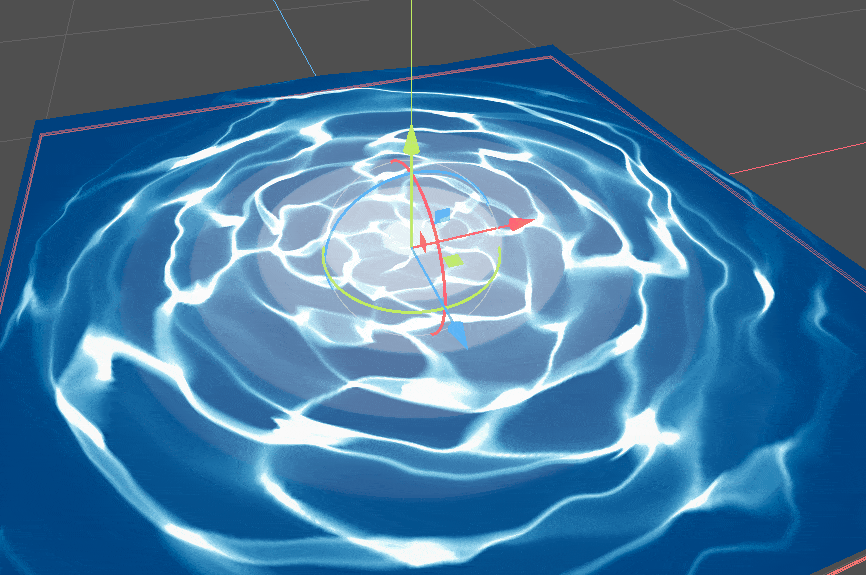 Checkpoint 3
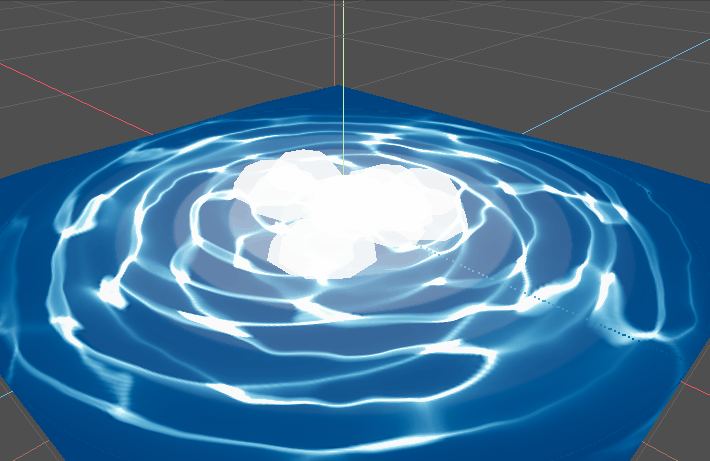
To finalize the effect, I added in some particles in the center and a little bit of vertex displacement before posting the final product on Twitter!
Weird lines bug fix
Thanks to a very useful tweet from QbieShay, I found out how to fix the annoying line bug that shows up in the shader:
Finally fixed that stupid line bug I was experiencing.
— NekotoArts (@NekotoArts) September 8, 2022
Thanks so much @qbieshay !#GodotEngine #Godot #VFX #water https://t.co/bPVSXRzqBP pic.twitter.com/NfiD32PI5w
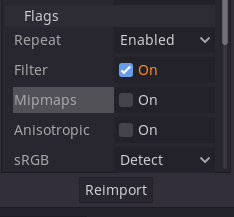
Simply re-import the caustics texture with mipmaps disabled to get rid of those weird lines:
References
Godot Shaders. (2021, May 4). Polar Coordinates. https://godotshaders.com/snippet/polar-coordinates/